
How to Get Rid of Musty Smell in Clothes: 7 Fixes That Actually Work

Picture this: you’ve got a presentation or dinner plans in an hour, you open the closet, grab your favorite sweater, and get hit with that unmistakable damp, mildewy smell. Annoying, yes. Unusual? Not really — it happens to almost everyone at some point. The good news is you can fix it without a dry-cleaning bill or a cabinet full of harsh chemicals.
Why Do Clothes Come Out of the Wash Smelling Musty?
It seems backwards — you just washed the clothes, so why do they smell worse than before? It usually comes down to a combination of a few things:
- Wet clothes sitting in the machine too long. Leave damp laundry in the drum for more than a couple hours and you’ve created a warm, humid breeding ground for bacteria and mold.
- Buildup inside the washer itself. Detergent, fabric softener, and body oils leave a slick residue coating the drum and detergent drawer over time — and mold loves feeding on that residue.
- An overloaded machine. Pack the drum too full and water can’t circulate properly through every item, so dirt and bacteria stay trapped in the thicker fabric.
- Putting clothes away before they’re fully dry. Even a small amount of leftover moisture, folded into a dark drawer, can turn sour within a day or two.
Fast Fixes for Damp, Musty Smell
When you need clean-smelling clothes quickly, a few kitchen staples will get you there:
| Method | Best For | What’s Doing the Work | Time |
|---|---|---|---|
| White vinegar soak | Set-in mildew, gym clothes | Acetic acid | 30–45 min |
| Baking soda paste | Spot treatment, underarms | Sodium bicarbonate | 20 min |
| Direct sunlight | Whites, heavy cottons | UV rays | 2–4 hours |
| Vodka spray | Dry-clean-only, delicates | Ethyl alcohol | 15 min |
1. The Vinegar Flush
White distilled vinegar might be the single most effective odor remover you already have in your kitchen. Its mild acetic acid breaks down organic buildup, strips out old detergent, and neutralizes smells without harming the fabric.
Here’s the process:
- Skip your usual detergent and fabric softener for this wash. Just load the musty clothes into the machine.
- Pour a cup of distilled white vinegar into the detergent compartment or straight into the drum.
- Wash on the hottest setting your garments’ care labels allow.
- Run a second rinse cycle with just water to clear out any leftover acidity.
One important warning: never combine vinegar with chlorine bleach. Mixing an acid with bleach releases toxic chlorine gas, so keep those two well apart.
2. The Baking Soda Treatment
Where vinegar handles alkaline smells, baking soda works the other direction — it absorbs acidic odors and soaks up excess moisture, which makes the two a nice complement to each other.
- Wash with your normal detergent as usual.
- Add half a cup of baking soda directly into the drum with your clothes.
- If your machine has an extended soak setting, use it — gives the baking soda more time to work into the fabric.
- Dry the clothes thoroughly outside or somewhere with good airflow.
3. Sunlight and Fresh Air
UV rays are a genuinely effective natural disinfectant — they break down mold spores and neutralize odor right down at the microscopic level. Hang damp or sour clothes outside with enough space between each item for air to move through. This works especially well on white cottons, heavy linens, and thick wool.
No Washer? No Problem: Fixing Musty Smell Without Washing
Traveling, short on time, or dealing with something dry-clean-only — sometimes a wash cycle just isn’t an option. These tricks handle it anyway.
Vodka spritz: Mix equal parts plain vodka and cold water in a spray bottle. Lightly mist the outside and inner lining of the garment from about a foot away, then hang it somewhere with good airflow. As the alcohol evaporates, it takes the odor with it.
Steam and essential oil: Fill a garment steamer with water, add a drop or two of lavender or tea tree oil, and pass the steam nozzle over the fabric a couple inches away. Heat breaks down the odor-causing microbes trapped in the fibers. Let the garment fully dry before hanging it back up.
The freezer trick: Seal the completely dry garment in a plastic bag, push out the extra air, and leave it in the freezer for 8 to 12 hours. Cold temperatures won’t kill bacteria outright, but they’ll stop it in its tracks — enough to reset a musty-smelling item. Shake it out and let it warm back to room temperature afterward.
Dealing With Wet Towel Smell Specifically
Towels and heavy hoodies have a denser weave than a regular shirt, so they hold onto moisture longer — and that means they need a slightly stronger approach.
Two-step wash:
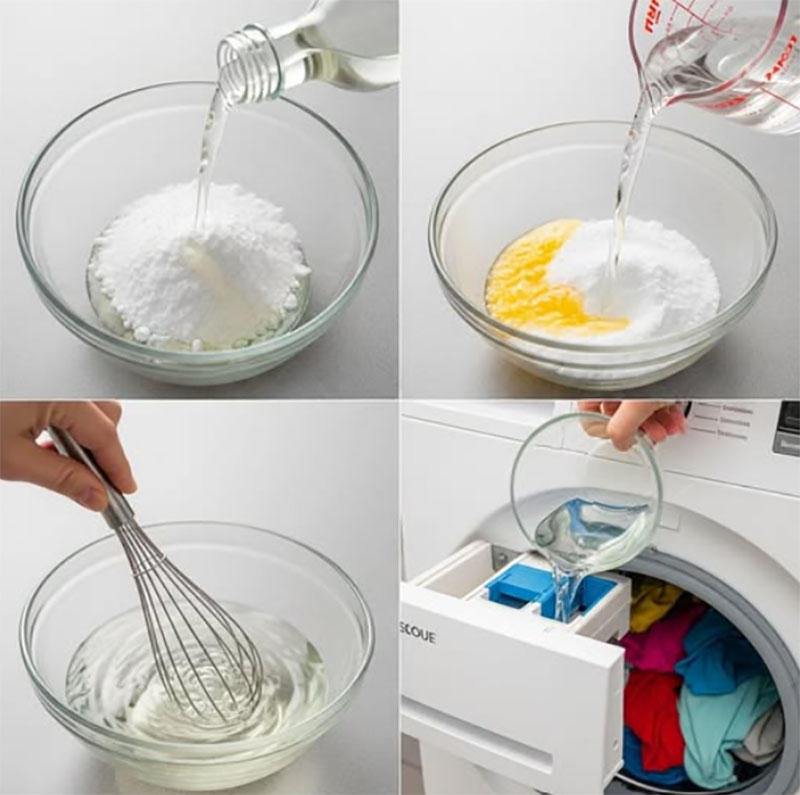
- Acid wash: Put the sour towels in the machine with a cup of white vinegar — no detergent this round. Wash on the hottest setting the fabric allows.
- Alkaline wash: Without removing the towels, add half a cup of baking soda plus your normal detergent, and run another hot wash.
- Dry on higher heat: Dry until completely dry, on medium-high heat. Tossing in a couple of wool dryer balls helps agitate the fabric and speeds up moisture removal.
Keeping Laundry Fresh Going Forward
A little routine maintenance goes a long way toward not having to deal with this at all:
- Clean the washer itself once a month. Run an empty tub-clean cycle with 2 cups of white vinegar, or use a dedicated cleaning tablet.
- Prop the washer door open after each load. This lets the internal seals dry out fully instead of staying damp between washes.
- Skip fabric softener. It leaves a greasy coating on the fibers that traps sweat and bacteria in. Swap it for half a cup of white vinegar in the dispenser instead.
- Don’t let washed clothes sit wet. Set a reminder to move them to the dryer or a rack within about 30 minutes of the cycle finishing.
A Few Common Questions
Can I mix vinegar and baking soda in the washer? Better not to — combined, they react instantly into carbon dioxide and saltwater, which cancels out the cleaning power of both. Use them in separate steps instead.
Will my clothes smell like vinegar afterward? No. The vinegar smell evaporates completely as the fabric dries — what’s left is just clean, neutral fabric.
Why do my clothes smell fine wet but musty once they’re dry? Usually it’s moisture trapped deep in a seam or hem that a short dryer cycle didn’t fully reach. As the garment sits in a warm room afterward, bacteria in that damp spot gets a chance to multiply.
How fast can mildew actually grow on damp clothes? Faster than you’d think — spores can start germinating in as little as 24 to 48 hours in a warm, poorly ventilated spot.
Does cold water get rid of musty smell? Not as well as warm or hot water. Cold water alone struggles to kill off odor-causing bacteria, so pair it with vinegar or baking soda if you’re stuck using it — and always check your care label before turning up the heat.
A musty or sour smell doesn’t mean a garment is done for. White vinegar, baking soda, sunlight, and just getting into the habit of drying clothes fully and promptly will handle almost any case. And if the smell keeps coming back no matter what you wash, it might not be the clothes at all — it could be worth wiping down your washer’s door seal and running a hot cleaning cycle.
How to Deep Clean a Front-Loading Washing Machine (And Get Rid of That Musty Smell for Good)
If your washer has started smelling a little off, the machine itself is usually the culprit, not your clothes. Front-loaders are especially prone to this because of their design — the sealed door and drum trap moisture in a few key spots, and that’s exactly the kind of damp, dark environment black mold loves. Three areas do almost all the damage: the detergent drawer, the drain filter, and the rubber door gasket. Clean those properly and the smell usually disappears for good.
Here’s the full process.
What You’ll Need
- White distilled vinegar (2 cups) or chlorine bleach (1 cup) — never both at once, mixing the two produces toxic fumes
- Baking soda (1/2 cup)
- Microfiber cloths and an old toothbrush
- Dish soap and warm water
- A small bucket or shallow pan, for draining the filter
Step 1: Tackle the Rubber Door Gasket
This is where mold shows up first and worst. Pull back the flexible rubber seal around the door opening — there’s a hidden groove underneath that rarely gets touched during normal use. Spray it thoroughly with white vinegar, or a diluted bleach solution if the mold is really bad. Scrub inside the fold with an old toothbrush to break loose any slimy black buildup and trapped debris, then wipe it down with a microfiber cloth. Leave the door open afterward so it can air out.
Step 2: Pull Out and Scrub the Detergent Drawer
Press the release tab inside the dispenser housing and slide the whole drawer out. If it has removable insert cups, take those out too. Soak everything in hot, soapy water, then scrub away any hardened detergent sludge or mildew with a brush. Before you put it back, wipe out the dark cavity where the drawer sits — that spot holds onto moisture and grime just as much as the drawer itself.
Step 3: Clean Out the Pump Filter
This is what stops standing water from turning sour inside the machine. Find the small access panel at the bottom front of the washer. Set a shallow tray and towel underneath the emergency drain hose, then release the small hose cap to let any trapped, stagnant water drain out into the tray. Unscrew the filter cap counterclockwise, clear out the lint, hair, and whatever small objects have accumulated in there, rinse the filter under warm water, and screw it back in tight.
Step 4: Run a Hot Cleaning Cycle With Vinegar
Make sure the drum is completely empty first. Pour 2 cups of white distilled vinegar directly into the detergent drawer, or drop a washing machine cleaning tablet straight into the drum. Run the Tub Clean or Sanitize setting, using the hottest water temperature and the longest cycle your machine offers.
Step 5: Run a Second Cycle With Baking Soda
Once the vinegar cycle finishes, sprinkle half a cup of baking soda directly into the drum and run a short hot wash or rinse cycle. This neutralizes any leftover acidity from the vinegar, scrubs out dissolved mineral deposits, and finishes off whatever odor is left.
Step 6: Wipe Everything Down and Let It Dry
Once the second cycle is done, wipe the drum interior, glass door, and rubber gasket dry with a microfiber cloth. Then prop the door and detergent drawer open slightly for a few hours — full air circulation is what actually keeps the mold from coming right back.
Keep It From Coming Back
- Leave the door cracked open between loads. Closing it fully traps humidity inside and basically resets the mold-friendly environment you just cleaned out.
- Skip liquid fabric softener. It leaves a waxy film inside the tub that mold actually feeds on. Half a cup of white vinegar in the rinse compartment does the same softening job without the residue.
- Run this cleaning cycle monthly. A quick hot cycle with vinegar or a cleaning tablet, once every 30 days or so, keeps buildup from ever getting bad enough to need the full deep clean again.
How to Keep Mold and Mildew Out of Your Bedroom Closet for Good
Closets are basically built to grow mold, whether we mean for them to or not. They’re dark, enclosed, and usually sit outside the reach of your home’s heating and cooling vents — which means moisture that would evaporate elsewhere just sits there instead, forming its own little damp microclimate. The fix comes down to two things: keeping humidity down, and keeping air moving. Here’s how to actually do both.
1. Controlling Moisture, Actively and Passively
The sweet spot is somewhere between 30% and 50% relative humidity. Once it climbs past 60%, mold spores start germinating fast — so the goal is to never let it get there.
- Moisture-absorbing bags. Something like DampRid, hung up or set out in a tub on a shelf, uses calcium chloride crystals to actively pull humidity out of the air and trap it in a sealed pouch. Simple, cheap, and it genuinely works.
- A small electric dehumidifier. For a walk-in closet, a compact peltier-style dehumidifier tucked in a corner runs quietly and barely uses any power, but it makes a real difference over time.
- Silica gel packets in storage bins. Toss a few into shoe boxes, storage bins, or suit bags — especially useful for protecting leather and wool, which are more sensitive to moisture damage than other fabrics.
2. Getting Air Moving
Stagnant air is just as much the problem as the moisture itself. Pack a closet full of tightly hung fabric and you create a bunch of little pockets where dampness has nowhere to go.
- Leave space between hangers. A rough rule of thumb: about two fingers’ width between garments. That’s enough for air to actually pass across the fabric instead of getting trapped against it.
- Swap in louvered doors. Solid wood doors seal the closet off completely. Louvered, slatted doors let air move passively between your air-conditioned bedroom and the closet itself.
- Prop the door open when you can. Even just during the day, or whenever the AC or a fan is running in the room.
- Get things off the floor. Shoes, boxes, bags — anything sitting directly on carpet or floorboards is closer to ground moisture. A raised wire rack solves that.
3. How You Handle the Clothes Themselves Matters Too
- Never hang up anything even slightly damp. A coat that got a little wet in the rain, or gym clothes you wore an hour ago — both introduce moisture and organic material that mold feeds on directly. Let everything air out completely before it goes back in the closet.
- Skip the thin plastic dry-cleaning bags. They trap whatever moisture is left in the fabric right against it. A breathable, non-woven fabric suit bag does the job without sealing anything in.
- Cedar is worth using. Cedar rings on hangers or cedar blocks tucked on shelves soak up minor surface moisture and naturally discourage both mildew and moths at the same time.
Quick Guide by Closet Type
| Closet Type | Main Risk | Best Combo |
|---|---|---|
| Small reach-in, solid doors | Poor ventilation, trapped dark air | Louvered doors + a hanging calcium chloride bag |
| Walk-in closet | Large volume of fabric, cold exterior walls | Small plug-in dehumidifier + about an inch of gap behind shelving |
| Basement or ground-floor closet | Moisture rising up from the foundation | A raised floor rack + an electric dehumidifier set to 45% |
Dealing With Closet Mold, Moisture, and Stubborn Sweat Stains: A Complete Guide
Closets cause more laundry and home-maintenance headaches than people give them credit for. They’re sealed off, dark, and rarely get any airflow from your home’s HVAC system — which makes them a prime spot for mold, musty smells, and moisture damage. Here’s how to handle it from start to finish: getting rid of mold that’s already there, sizing the right dehumidifier, repainting to stop it from coming back, fixing airflow for good, and dealing with the yellow sweat stains that show up on white shirts along the way.
Removing Black Mold From Closet Walls
First, a safety note: scrubbing dry mold or spraying it carelessly sends millions of spores straight into your bedroom air. Don’t skip the containment steps below.
When to call a professional instead: if the mold covers more than about 10 square feet (roughly a 3-by-3-foot patch), or if it came from contaminated sewage water, this isn’t a DIY job. Hire a mold remediation specialist.
What you’ll need:
- An N95 or P100 respirator, goggles without vent holes, and heavy-duty rubber gloves
- Undiluted distilled white vinegar (works best on porous drywall) or an EPA-registered fungicidal cleaner — skip chlorine bleach on painted drywall, since it sits on the surface while its water content soaks down into the plaster, which actually feeds the roots underneath
- Microfiber cloths, a soft nylon scrub brush, plastic trash bags, painter’s tape, and plastic drop cloths
1. Clear and seal off the space. Pull everything out of the closet — clothes, shoes, shelving, all of it. Wash any affected clothing in hot water with vinegar. Tape plastic sheeting over the closet doorway to keep spores from drifting into the bedroom, and set a box fan pointing out a window to pull the air away from the rest of the house.
2. Apply the vinegar treatment. Fill a spray bottle with undiluted 5% white vinegar and spray the affected wall until it’s damp — not dripping, just thoroughly wet. Let it sit untouched for at least an hour. The acetic acid needs that time to soak into the drywall and kill the mold roots underneath the surface.
3. Scrub and wipe it down. Dampen a scrub brush or sponge with your cleaning solution and gently work the mold off the surface — go easy, pressing too hard can tear the drywall paper. Wipe up what comes loose with disposable cloths or paper towels, and toss them straight into a sealed trash bag as you go.
4. Disinfect and let it dry. Wipe the wall down a second time with a rag lightly dampened in vinegar or a biocide spray to catch any remaining surface spores. Then let it air dry completely — 24 to 48 hours, with a fan or dehumidifier running in the space.
5. Prime and paint if needed. If the wall’s still stained, or you just want extra insurance against it coming back, apply a mold-resistant stain-blocking primer (Zinsser’s Mold Killing Primer is a solid option) followed by mold-resistant interior paint.
When cleaning isn’t enough: drywall is porous, and if the wall feels soft, mushy, crumbling, or bowed, the mold has already rotted the gypsum core inside. At that point, no amount of surface cleaning fixes it — you’ll need to cut out the damaged section (going about 12 inches past the visible mold) and replace it.
Choosing the Right Dehumidifier for Your Closet
Closets are small and enclosed, so a full-size compressor dehumidifier is usually way more than you need. What you pick really comes down to two things: how big the closet is, and whether there’s an outlet nearby.
| Closet Type | Daily Moisture Extraction Needed | Best Option | What to Look For |
|---|---|---|---|
| Small reach-in (up to 15–20 sq ft) | Passive, roughly 8–10 oz per month | Rechargeable desiccant / wireless pack | No outlet required; beads change color to show when it needs recharging |
| Standard walk-in (20–50 sq ft) | 10–16 oz (300–500 ml) per day | Compact Peltier (thermoelectric) unit | Very quiet, low power draw (under 40W), auto shut-off when full |
| Large walk-in / master closet (50–100+ sq ft) | 20–35 oz (600–1000 ml) per day | High-capacity Peltier or small compressor unit | Built-in humidistat set to 45%, optional continuous drain hose |
A few things worth checking before you buy:
- No outlet in the closet? Go wireless — silica gel desiccant packs (Eva-Dry’s E-333 or E-500 are common picks) or hanging moisture-absorber bags do the job without running an extension cord under the door.
- Tank size and auto shut-off. Look for at least 30–50 oz of capacity so you’re not emptying it every day, and make sure it has an automatic overflow shut-off.
- Noise level. Anything under 35–40 dB is a safe bet, especially important if the closet backs right up against where you sleep.
- A built-in humidistat. Higher-end units let you set a target humidity. 45% is the sweet spot — enough to stop mold without drying out leather shoes and coats.
Repainting With Mold-Resistant Products
Once the wall is clean and dry, mold-resistant primer and paint seal in any lingering stains and add an antimicrobial barrier that stops spores from taking hold again. Regular wall paint actually contains organic binders that mold can feed on — specialized coatings avoid that problem entirely.
What you’ll need:
- A mold-killing, stain-blocking primer (Zinsser Mold Killing Primer or KILZ Mold & Mildew Primer both work)
- An acrylic latex paint formulated with antimicrobials, in a satin or semi-gloss finish — that sheen resists moisture far better than flat or matte paint
- Painter’s tape, drop cloths, a 2-inch angled sash brush, a 3/8-inch nap roller with a mini frame (easier to handle in a tight closet), and a 220-grit sanding sponge
1. Prep the surface. The wall needs to be completely free of active mold and fully dry before you start. Wipe it down with vinegar or an EPA-registered cleaner and let it dry at least 24 hours. Lightly scuff any glossy spots with the sanding sponge so the paint has something to grip, then wipe away the dust.
2. Protect everything else. Lay drop cloths on the floor, and tape off baseboards, door frames, and any shelving tracks.
3. Apply the primer. Cut in the corners and edges with your angled brush, then roll the rest with the nap roller, working in small “W” patterns to fully cover any old stains. Let it dry 2 to 4 hours (check the can for specifics).
4. Apply the first coat of paint. Stir it well, cut in the edges first, then roll the main wall area. Satin or semi-gloss gives you a washable surface that resists moisture soaking in. Let it dry about 4 hours.
5. Apply a second coat. For full color depth and protection. Pull the painter’s tape while this coat is still slightly damp, so you don’t tear the fresh paint film.
6. Let it cure before reloading the closet. This step matters more than people think — leave the doors wide open and run a fan or dehumidifier for a full 48 hours so the paint cures completely and any fumes clear out before your clothes go back in.
Fixing Airflow for Good
Better airflow stops moisture pockets from forming in the first place, keeps your clothes smelling fresh, and keeps mold spores from settling on fabric. It’s really a mix of how you organize things and what materials you store them in.
Hanger spacing:
- The two-finger rule. Leave about 1 to 2 inches between hangers. If you have to force garments apart to slide a hanger through, there’s no room for air to move.
- Mix up lengths. Hang long items like dresses and coats on one end, shorter items on the other — it opens up a vertical channel underneath the short clothes that lets cooler air near the floor rise up.
- Keep heavy and light fabrics apart. Don’t sandwich a thin cotton shirt between two bulky winter coats — the dense weave of the coats traps humidity right against the lighter fabric.
Storage material swaps:
| Zone | Skip | Use Instead | Why |
|---|---|---|---|
| Shelving | Solid MDF or plywood | Wire racks or slatted wood | Air can move vertically between stacked items |
| Bins/drawers | Solid plastic totes | Wire mesh baskets | Prevents moisture from getting trapped against folded clothes |
| Garment covers | Plastic dry-cleaning bags | Canvas or non-woven cotton covers | Blocks dust while still letting fabric breathe |
| Shoe storage | Stacked plastic boxes on carpet | Slatted metal or bamboo racks | Lifts shoes off cold floors where condensation forms |
Folding and stacking:
- Keep stacks of sweaters, jeans, or t-shirts to no more than 3 or 4 items high — bigger piles compress fabric and create dark, airless pockets at the bottom.
- File-fold instead of stacking (the “KonMari” approach) — standing shirts and pants up like index cards in a drawer or bin exposes more of each garment to open air.
- If you’re using vacuum-sealed bags for off-season clothes, open them up every couple months in a dry room to let the fibers air out before resealing.
A few structural fixes:
- Keep furniture and hanging clothes at least an inch away from exterior or back walls — those walls run colder and are where condensation tends to form first.
- Get boxes and clothing off the floor entirely; low wire risers that lift things 2 inches up make a real difference.
- Swap solid closet doors for louvered ones, so air can passively exchange with the rest of the bedroom.
Getting Rid of Yellow Sweat Stains
That yellowing around collars and underarms isn’t just dried sweat — it’s actually a chemical reaction between the protein in your sweat and the aluminum salts in most antiperspirants, which bakes into the fabric fibers over time. The fix uses natural acids and enzymes to break that bond apart without harming white cotton.
What you’ll need:
- 1 cup distilled white vinegar
- 1/2 cup baking soda
- 1/2 cup 3% hydrogen peroxide (a natural, oxygen-based brightener)
- 1 tablespoon dish soap
- An old toothbrush or laundry scrub brush
1. Pre-soak in vinegar. Mix 1 cup of white vinegar into 4 cups of warm water, submerge the stained shirt fully, and let it soak for 30 minutes. This loosens the mineral bonds holding the stain in place. Wring it out — don’t rinse yet.
2. Mix the paste. Combine the baking soda, hydrogen peroxide, and dish soap into a thick paste. The peroxide brightens without bleaching color, and the dish soap breaks up trapped body oil.
3. Apply and scrub. Spread the paste generously over the yellowed area and work it in with the toothbrush in small circles for 1 to 2 minutes.
4. Let it sit. Leave the paste on for 30 to 60 minutes, out of direct sunlight so the peroxide doesn’t dry out too fast.
5. Wash on hot. Run it through a normal wash on the hottest setting your care tag allows. Adding another half cup of baking soda to the drum gives it a little extra whitening boost.
6. Line dry in the sun — if the stain’s gone. Check before you even think about the dryer. If the stain cleared, hang the shirt outside to dry; UV light adds a bit of natural whitening. If any stain is still visible, skip the dryer entirely — heat will set what’s left permanently.
Stopping it before it starts:
- Switch to an aluminum-free deodorant — the aluminum salts are what react with sweat protein to cause the yellowing in the first place, so removing them from the equation solves the problem at the source.
- Give your deodorant 2 to 3 minutes to dry fully before putting a shirt on.
- Don’t let sweaty white shirts sit in a dark hamper for days — wash them promptly, or at least give them a quick cold rinse in the meantime.
How to remove musty smell from clothes (5 Proven Home Remedies)
How to Remove Sweat Smells From Clothes (5 Easy Hacks)
how to get white clothes white again -3 Golden Rules for All Fabrics
How to Get Rid of Musty Smell in Clothes, Fast
How to Remove Musty Smell From Clothes: 7 Fast Fixes
writer – Jursika mirel